本文记录下如何在python中调用C/C++中函数。本文主要参考MSDN 中Create a C++ extension for Python 一文。
搭建python环境
由于我是直接参考的MSDN上的教程,所以没有直接下载python安装包,而是直接通过Visual Studio 2017来安装的python。所以按照MSDN上的步骤,通过Visual Studio Installer来安装Python模块。建议同时安装32bit和64bit。
安装好之后,默认安装的路径是C:\Program Files (x86)\Microsoft Visual Studio\Shared。可以建立一个文件夹快捷方式放在C盘根目录,方便以后导航。
接下来设置一下系统的环境变量,首先建立PATHHOME环境变量为Python安装目录:
1 | C:\Program Files (x86)\Microsoft Visual Studio\Shared\Python36_86\ |
然后修改PATH环境变量,加入以下路径:
1 | ;%PYTHONHOME%;%PYTHONHOME%\Scripts;%PYTHONHOME%\DLLS; |
以后如果想使用Python 64位的,直接修改PYTHONHOME环境变量为Python 64目录即可。
验证环境
按照MSDN上,建立一个Python工程,直接run一下试试,验证Python环境是否成功。
按照MSDN上,建立一个c++ 工程,然后设置下project property,具体设置项按照MSDN上的设置项。然后编写c++ function。build以下,验证C++工程无问题。
注意:
- 根据MSDN,需要将在Project Property中C/C++ Code Generation -> Runtime Library 设置为Multi-threaded DLL(/MD)
- 工程设置中将
$(PYTHONHOME)\include加入到Additional Include directory中。$(PYTHONHOME)即是我们在上一步中设置的环境变量。 - 在Linker -> General -> Additional Library Directories 中加入
$(PYTHONHOME)\libs - 将Project platform设置为win32 平台。
编写代码
在原有的c++工程中新建一个cpp文件,然后加入以下代码
1 | //always put Python header first, if not found this header, |
build工程查看是否成功。下面是对其几点说明。
必须要有一个
PyInit_<model_name>导出函数,Python会通过这个函数来初始化模块。给C++函数写一个对应的wrapper 函数,比如上述中的
test_mul函数,wrapper函数的签名是Pyobject* (Pyobject* self, Pyobject* args)。在Python中所有的type都是“继承”自Pyobject(之所以打引号,是因为python是用C写的,并没有继承的概念)。在wrapper函数中的第二个参数是args表示从Python脚本中传递过来的参数包。可以使用PyArg_ParseTuple来取得。
int
PyArg_ParseTuple(PyObject *args, const char *format, …)Parse the parameters of a function that takes only positional parameters into local variables. Returns true on success; on failure, it returns false and raises the appropriate exception.
其中第二个参数format表示如何解析传递的参数包,”ii”表示两个integer,”s”表示字符串,具体请参考Parsing arguments and building values
定义一个数组,并枚举需要导出的C++函数,如上面的
superfastcode_methods,数组中每个元素都是一个PyMethodDef结构体。1
2
3
4
5
6
7
8struct PyMethodDef {
const char *ml_name; /* The name of the built-in function/method */
PyCFunction ml_meth; /* The C function that implements it */
int ml_flags; /* Combination of METH_xxx flags, which mostly
describe the args expected by the C func */
const char *ml_doc; /* The __doc__ attribute, or NULL */
};
typedef struct PyMethodDef PyMethodDef;其中ml_flags中METH_O表示只有一个参数,METH_VARARGS表示可以有多个参数。在wrapper class中会使用这些”声明”来取得参数。
定义一个
PyModuleDef结构体,如上面的superfastcode_module。表示module名称等信息。
使用定义好的Module
Module定义好之后,可以有两种方式导入到python中。
如果跟Python工程属于同一个Solution,可以直接在Python Project中直接Reference过来。具体做法是在Python工程-> References -> Add References。
另外一种方式,可以通过distutils来编译成Python的一个模块。distutils通过setup.py 脚本来编译C/C++ 源文件。一个简单的setup.py如下。
1 | from distutils.core import setup, Extension, DEBUG |
上面source.cpp中依赖了一个StaticLib1中的函数,所以加入了libraries 供链接用。
目前文件结构如下图:
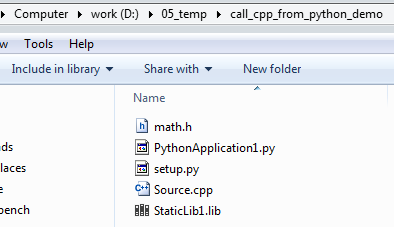
其中math.h 是StaticLib1的头文件。PythonApplication1.py是测试用的脚本。
我们首先需要编译source.cpp。在该目录下打开cmder(cmder一款统一命令行工具,也可以用cmd命令行),执行
1 | pip install . |
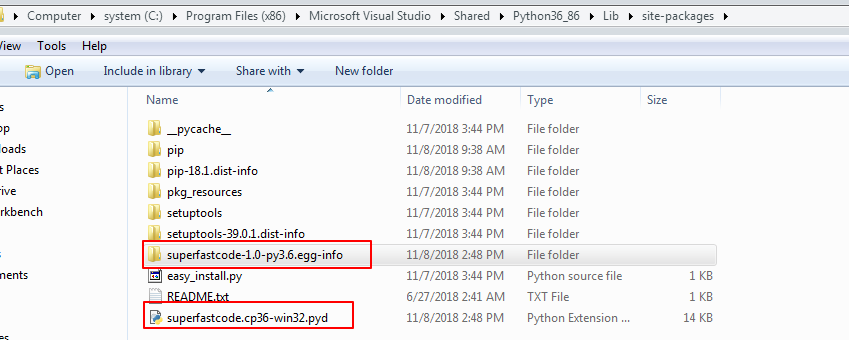
此操作会将module安装到Python的site-package中。然后我们就可以在python脚本中使用了
1 | #demo test |
在Visual Studio中F5运行或者在命令行执行python PythonApplication1.py,验证是否成功。
卸载已安装的包
如果在上一步执行pip install .的时候提示已经该包已经安装过,无法卸载。执行pip uninstall your_module_name也无法卸载。可以通过删除Python安装目录下的site-packages来卸载该包。
注意采用这种卸载方式是因为我们使用的distutils来安装package的,Python下可以使用其他包管理来管理,如easy_install
参考资料
- https://docs.python.org/3/c-api/arg.html
- https://docs.python.org/3/extending/building.html
- https://docs.python.org/3/c-api/structures.html
- https://stackoverflow.com/questions/402359/how-do-you-uninstall-a-python-package-that-was-installed-using-distutils
- https://docs.python.org/3.7/c-api/arg.html
- https://docs.microsoft.com/en-us/visualstudio/python/working-with-c-cpp-python-in-visual-studio?view=vs-2017